


- موجودی: در انبار
- MODEL: WX-W1209 | WX-101W THERMAL SWITCH MODULE
ماژول کنترل دما | ترموستات دیجیتال WX-101W |WX-W1209
ماژول با سنسور دمای و نمایشگر دیجیتال سون سگمنتی و رله خروجی با قابلیت کنترل (خاموش و روشن کردن) تجهیزات سرمایشی و گرمایشی برقی مانند انواع المنت و فن و پنکه و …
- قطع و یا وصل جریان برق(کلید زنی توسط رله) در دمای قابل تنظیم
- تنظیم دما توسط پوش باتوم (کلید) های روی برد
- رنج دمای عملکرد ماژول از منفی 50 تا مثبت 110 درجه سانتی گراد
- دارای انتخاب عملکرد در سیستم گرمایشی یا سرمایشی (فانکشن کد F-1)
- قابلیت تعیین محدوده قطع و وصل تا 5 درجه از دمای تنظیمی (فانکشن کد F-3)
- دقت 0.1 درجه سانتیگراد
- دارای یک سنسور دمای ترمیستوری با سیم و عایق بندی شده
- دارای نمایشگر سون سگمنتی جهت نمایش دما
- ولتاژ کاری ماژول 12 ولت مستقیم می باشد
- جریان قابل تحمل تا 2A
- قابل نصب بر روی دستگاه های جوجه کشی دست ساز
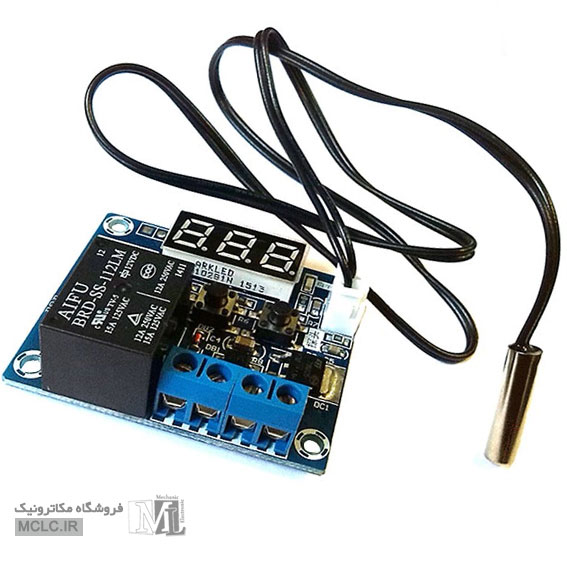
W1209 آبی
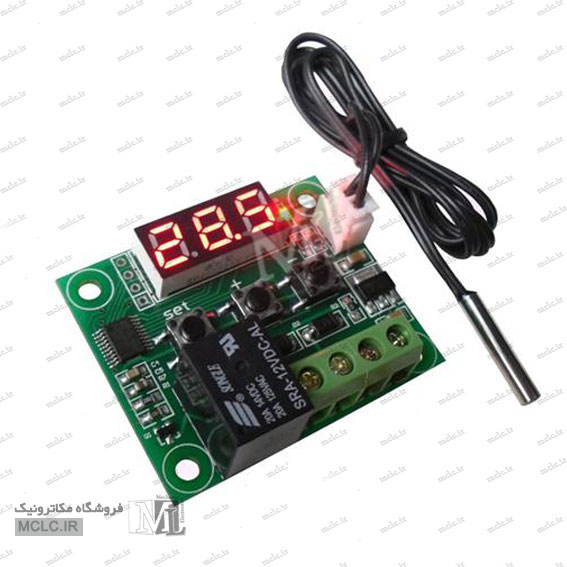
W1209 سبز
خدمات پس از فروش:
این کالا خدمات پس از فروش و امکان مرجوعی ندارد و مهلت بازگشت آن منوط به پلمپ بسته بندی می باشد. بنابراین، پیش از باز کردن بسته بندی آن لازم است ابتدا بصورت ظاهری آنرا بررسی نمایید و در صورت سلامت ظاهری ، پلمپ را باز و استفاده نمایید.
مستحضر باشید سازنده کالا شرایط تعمیر و خدمات پس از فروش ارائه نداده است و بنابراین فروشگاه نیز نمیتواند در این خصوص سرویس خاصی ارائه نماید.
همچنین در صورتی که قصد خرید عمده از این کالا را دارید پیشنهاد میگردد تعدادی نمونه خریداری و کیفیت آنرا با توجه به نیاز خود بررسی نمایید و سپس اقدام به خرید عمده نمایید. پس از رسیدن محموله نیز ، بسته بندی هر کدام را بصورت جداگانه و تکی باز نموده و تست کنین و در صورتی که مورد تایید شما قرار نگرفته ، از باز کردن بقیه اقلام خودداری نموده و مطابق فرایند استرداد کالا، اقلام پلمپ را استرداد نمایید.
در صورت انتخاب گزینه تست: کالا پیش از ارسال توسط فروشگاه تست اولیه میگردد، یعنی صرفا ولتاژ ورودی اعمال شده و خروجی آن کنترل میگردد و به این ترتیب سلامت کالا کنترل میشود ولی همچنان کالا فاقد گارانتی و خدمات پس از فروش است.
Instructions
First use a connection power supply and load line, can for power supply of temperature control board and display is the current temperature.Press”+“ or” —”to adjust the control temperature, After press ‘setting' key to save. Out.
The temperature control board for automatic control mode of heating. According to the set temperatureautomatic control relay on-off, temperature control board relay electric contactor is 2A, can match most of the high power load equipment.
Digital display and status indication
Light up: relay connected
Light off: relay disconnect
For sensor: display “EO" for sensor open circuit, display ‘---' for sensor short circuit, no matter what kind of fault control board will cut off the load and automatically protect!
| Function Code | Functional Specification | Set Range | Factory Settings |
| F-1 | Heating/ cooling | HH/CC | HH |
| F-2 | Back to setting | 0.1~20℃ | 2℃ |
| F-3 | Temperature calibration | -5.0℃~5.0℃ | 0.0℃ |
| F-54 | Delay start time | 0-10minutes | 0 |
| Automatically Protect | High temperature protection | More than120℃ | Automatic |
| Disturbance Display | EO | Probe open circuit | Automatic |
| Disturbance Display | --- | Probe short circuit | Automatic |
WX - 101W Instructions
1. Electricity factory Setting: hold the setkey, set the release button 3 seconds torestore the factory Settings!
2. Control mode: press "set" button at once, Let it display F - 1, and then press "set"button to enter the F - 1 manu ,and then click
"+" button display “H H ” for heating control mode, according to "-" button display "CC" to refrigeration control mode, Last press
"set" for preserve and exsit.
3. Temperature Setting: under the displays the current temperature directly at '+' or '-'button can set the required control point
temperature, After finish the installation.press "set" for preserve and exsit.
4. Return difference Setting: Press "set"button display "F - 1", then press the "+"button or "-" button can adjust function, when
display F - 1 ,press "+" button to let its display F - 2, This time press "set" button to enter at F - 2 functions, it's returndifference
parameter adjustment interface,press the "+" or "-" button to adjust return difference values, the return difference mean start
and stop temperature difference, if want to control the heating ,If control temperature setting 30 degrees, Return difference set to
2, is the current temperature over 30 degrees, Relay disconnect.lower than 28 degrees relay connect, The Return difference of 2!
Refrigeration control is opposite control state!
5.Temperature correction Setting: adjustment function is display F -3, according to press a"set" button to enter the F - 3 parameters to adjust interface, the adjusting range of -5.0~ 5.0, when the temperature is not accurate, can be temperature
correction according this function, if the measurement of the current temperature is higher than the actual temperature of 0.5 degrees, calibration parameters can be adjusted to -0.5, press "setting" for preserve.
6. Delay start time Setting: after "stop "start to the next start, To satisfy setting time and then can be start , generally forprotect
the compressor at refrigeration control mode, the heating control can be set to "0", the factory default is "0", delay time "0 "to "10 "minutes.
نحوه تست و راه اندازی :
-
بسته بندی ماژول را باز نمایید
-
کانکتور سنسور را در جهت صحیح به کانکتور روی برد متصل نمایید
-
ولتاژ منبع تغذیه آزمایشگاهی را روی 11 ولت قرار دهید
-
با رعایت پلاریته، ولتاژ تغذیه را متصل نمایید (12v+ را به مثبت منبع تغذیه و GND را به منفی منبع تغذیه وصل کنید)
-
نمایشگر دما، دمای محیط را نمایش خواهد


